

Transactions Overview
The Transactions page is your complete transaction ledger. View all financial activity across connected bank accounts, credit cards, and payment processors. Search, filter, categorize, export, and manually add transactions to maintain a comprehensive record of your company's financial activity.
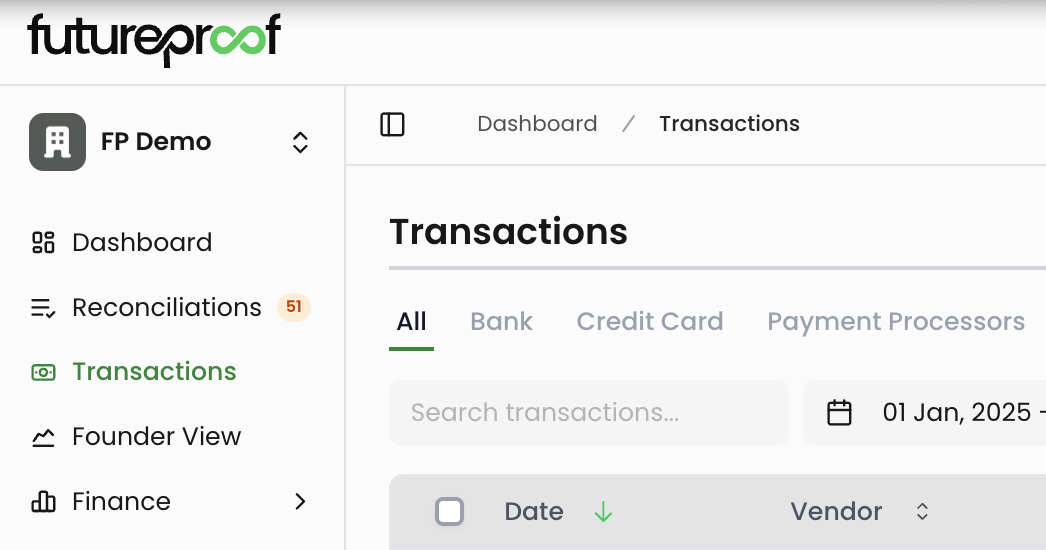
Accessing the Transactions Page
Navigate to Transactions in the left sidebar. The page displays all transactions from your connected accounts along with any manually entered transactions.
Page Layout
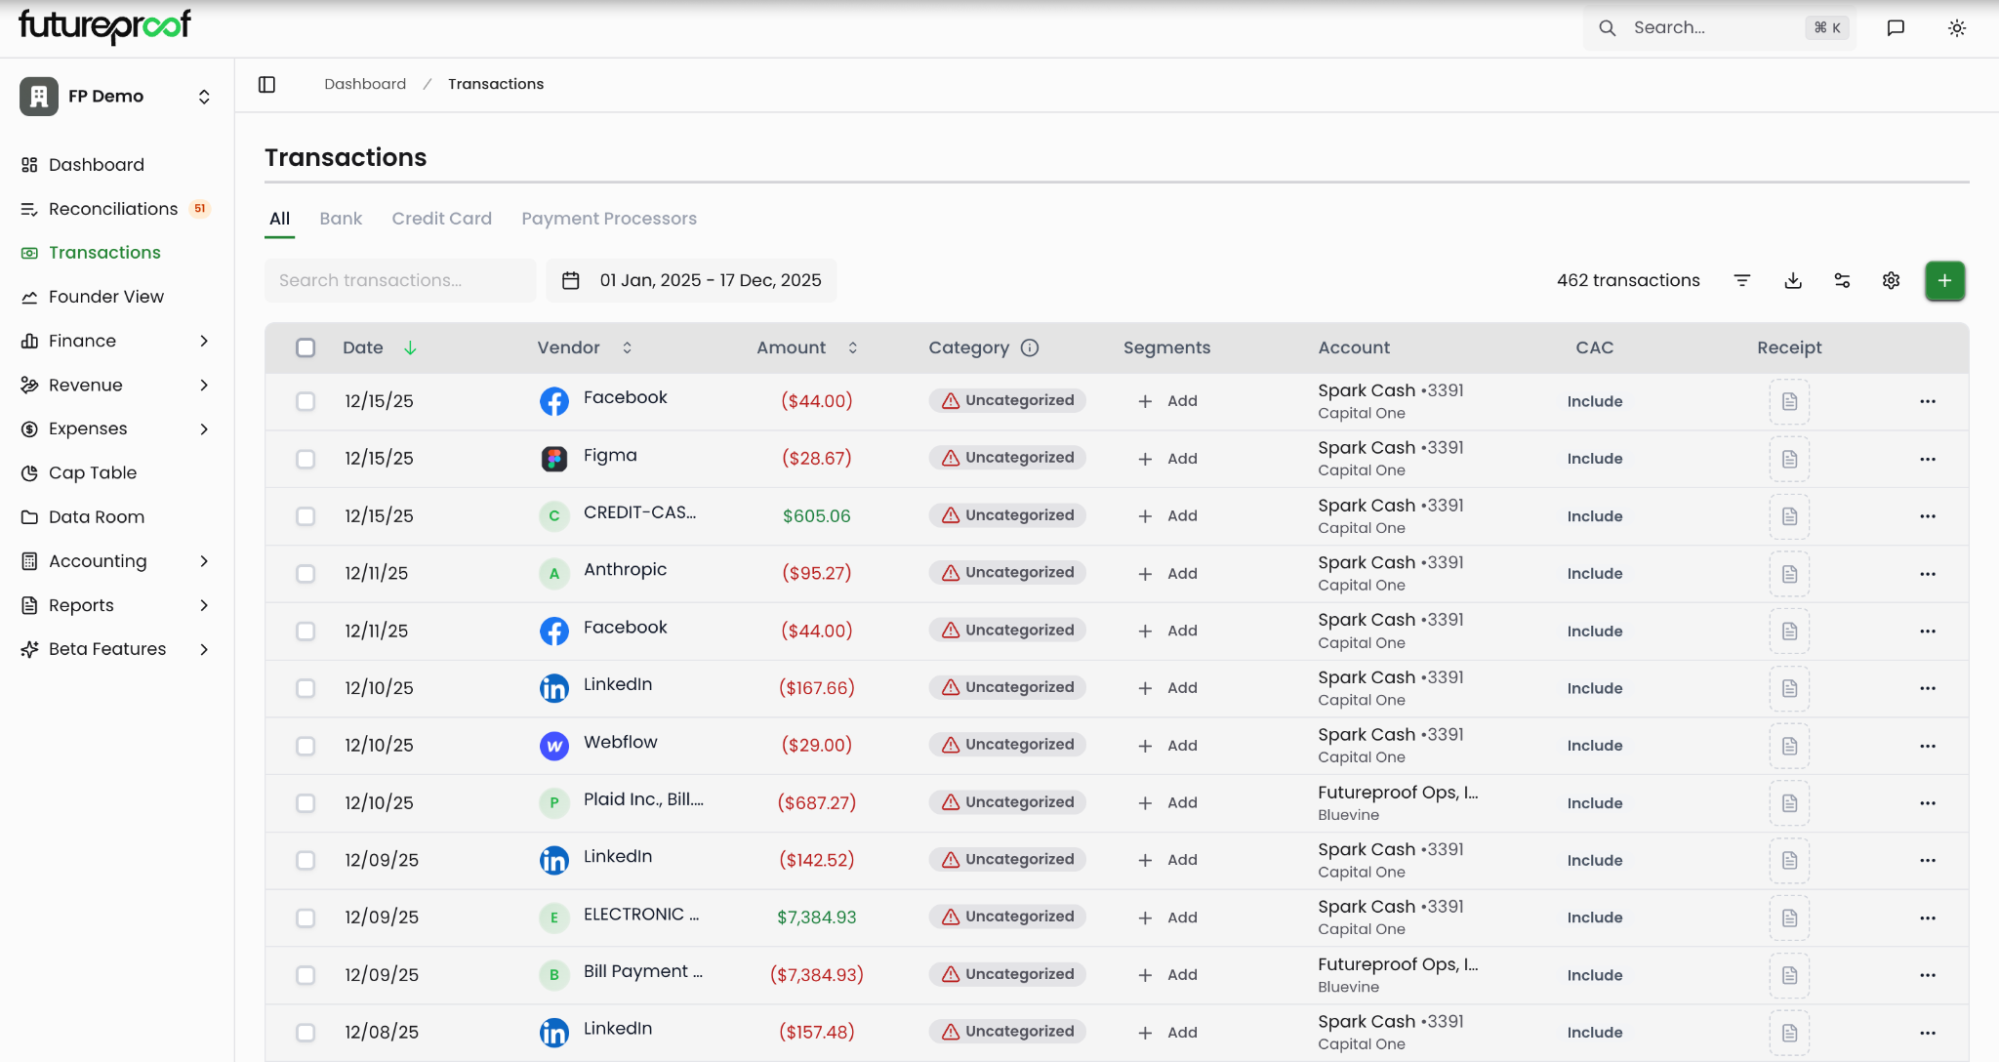
The Transactions page includes several tabs at the top: All, Bank, Credit Card, and Payment Processors. The All tab shows every transaction regardless of source. Bank and Credit Card tabs filter transactions by account type, helping you quickly review activity from specific financial accounts.
The header displays your total transaction count for the selected date range. A search box lets you find transactions by vendor name. The toolbar includes buttons for filtering, exporting, column customization, settings, and adding new transactions.
Searching Transactions
The search box filters transactions by vendor name. Type any part of a vendor name to instantly narrow the transaction list. For more comprehensive filtering across multiple fields, use the filter menu.
Why it matters: Quick vendor search helps you track spending with specific suppliers, verify recurring charges, or find transactions you need to review or categorize.
Filtering Transactions
Click the filter icon in the toolbar to open advanced filtering options. Filters include Source (which account the transaction came from), Category (accounting classification), Vendor (merchant or payee), Smart Segments (department tags), Amount (transaction value ranges), Receipt Status (whether receipts are attached), and CAC (whether the transaction is included in customer acquisition cost calculations).
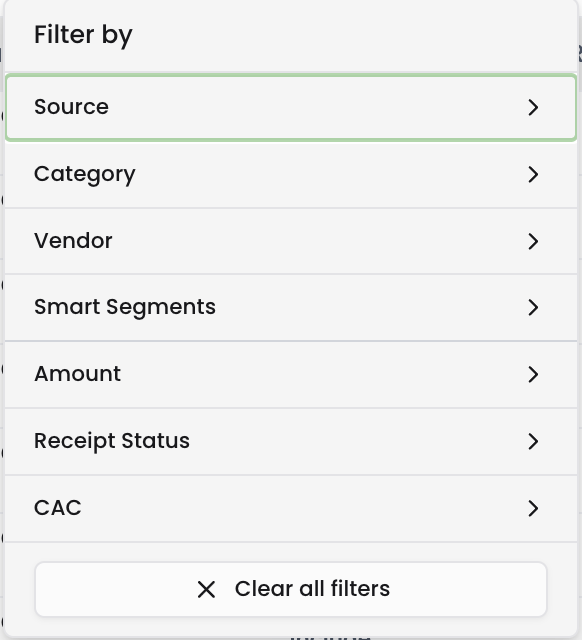
Each filter can be combined with others to create precise transaction views. For example, filter for uncategorized transactions from your main credit card over $500 to prioritize high-value items that need attention. The "Clear all filters" option at the bottom resets all active filters.
Why it matters: Effective filtering helps you analyze spending patterns, identify transactions that need categorization, track departmental expenses, or prepare specific reports without scrolling through hundreds of transactions.
Date Range Selection
The date picker at the top of the page controls which transactions appear in your view. Click the date range to open the picker and choose from preset options: Current Month, Last 2 Weeks, Last Month, Last 3 Months, Last 6 Months, Year-to-Date, or All Time. You can also select custom date ranges by clicking specific dates on the calendar.
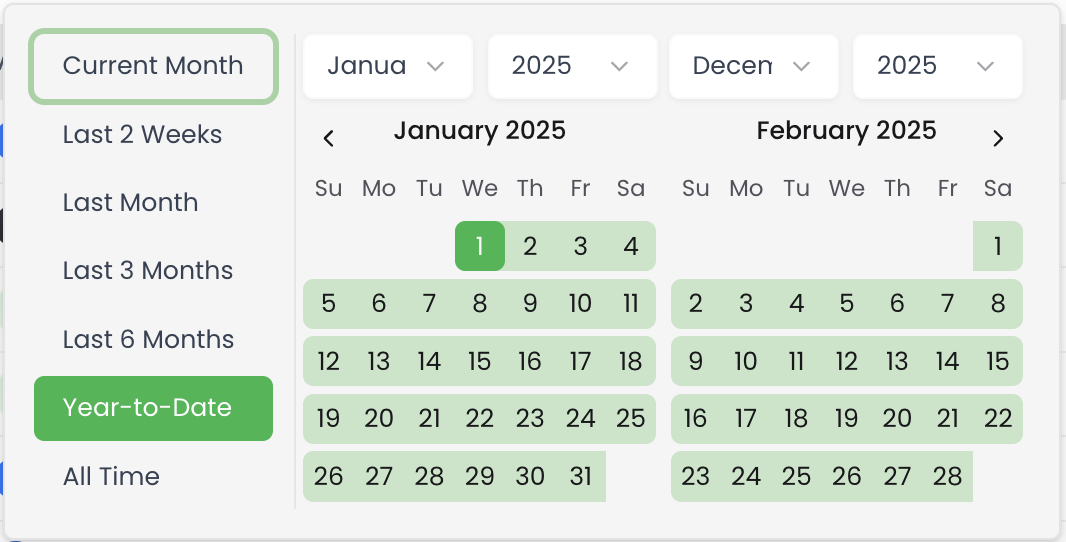
Why it matters: Date filtering helps you focus on relevant time periods for month-end close, quarterly reviews, tax preparation, or analyzing spending trends over specific periods.
Transaction Table Columns
Date
The date column shows when each transaction occurred. Click the sort arrow to reorder transactions chronologically or reverse chronologically.
Vendor
Displays the merchant or vendor name with their logo or icon. This is the primary identifier for each transaction and what the search box filters against.
Amount
Shows the transaction value. Expenses appear in red with parentheses (e.g., ($44.00)), while income appears in green. The amount column can be sorted to find your largest expenses or revenue items.
Category
Shows the assigned accounting category from your chart of accounts. Uncategorized transactions display an orange "Uncategorized" badge with a warning icon. Categorized transactions show the account code and category name (e.g., "79400 - Software Subscription - Cost of Revenue").
Why it matters: Accurate categorization determines where transactions appear in your financial reports, dashboards, and P&L statements. The category directly impacts your expense breakdown, cash flow analysis, and financial decision-making.
Segments
Displays any department tags assigned to the transaction. An empty segment column shows "+ Add" which opens the transaction detail modal where you can assign department tags like Engineering, Sales, Marketing, Operations, Customer Success, Product, Finance, or HR.
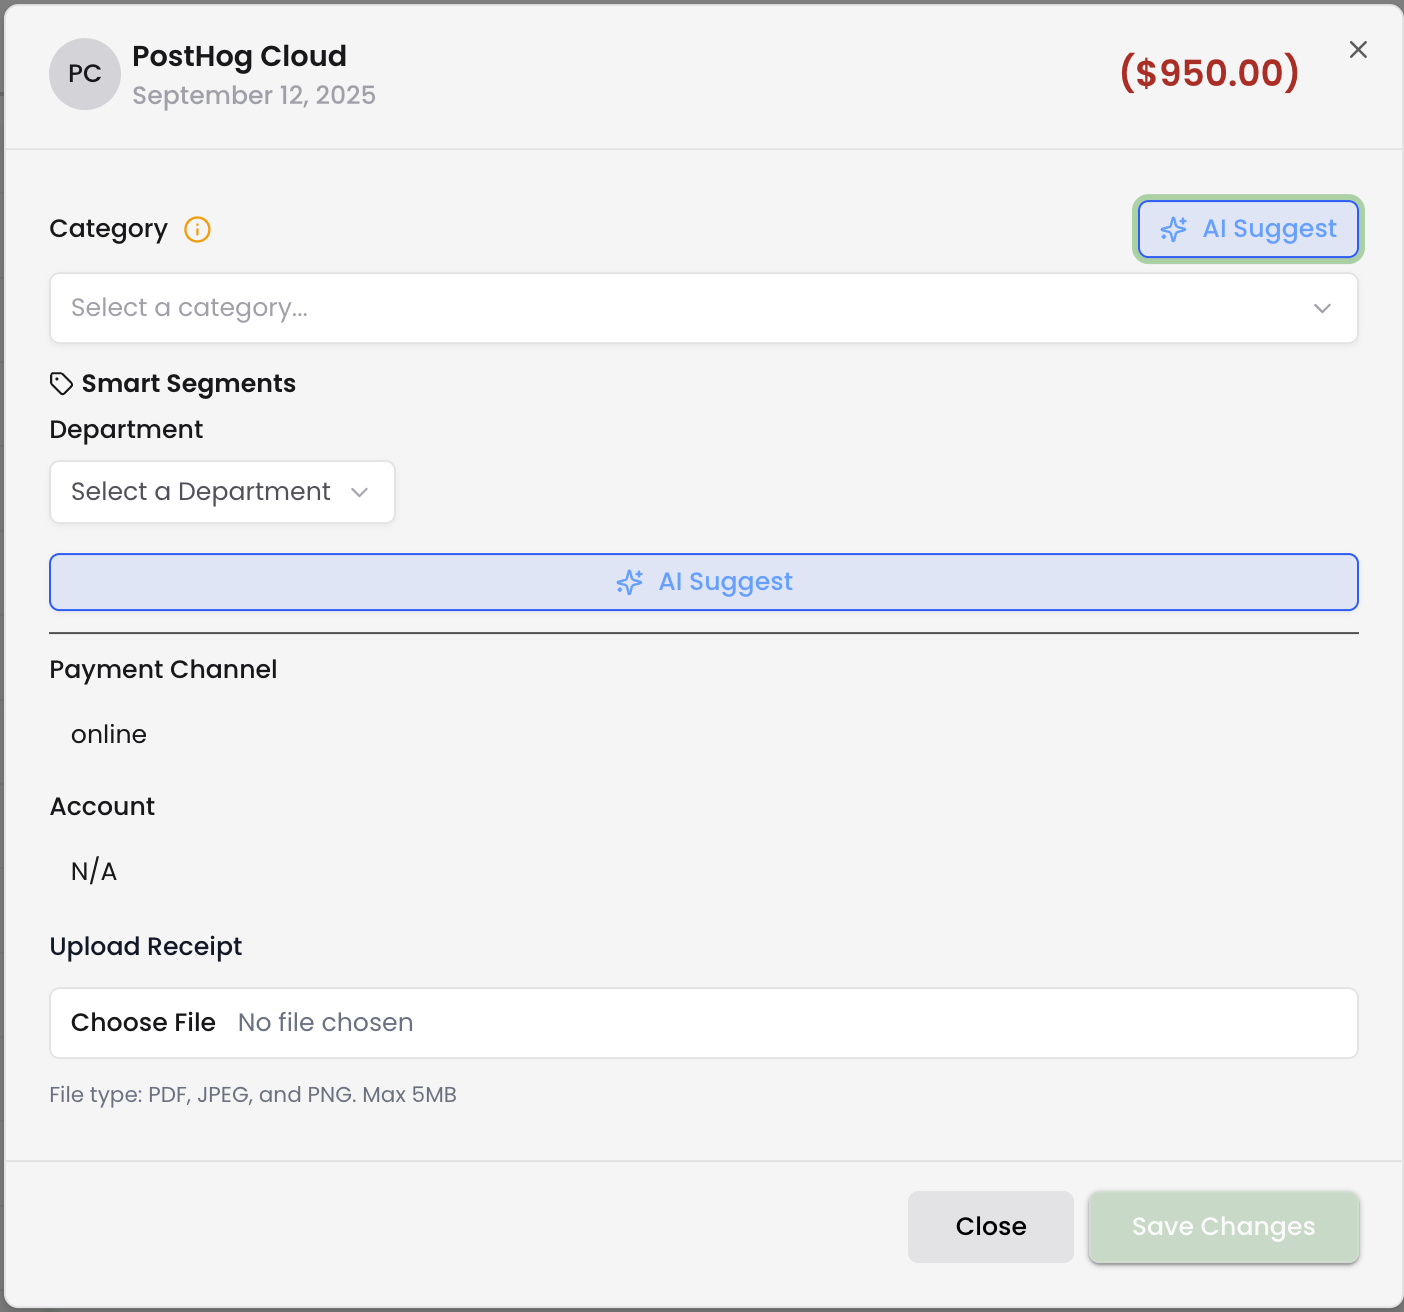
Why it matters: Department tagging enables granular expense analysis by team. Track which departments drive costs, allocate expenses to specific projects, build departmental budgets, or analyze team-specific burn rates as your company scales.
Account
Shows which connected bank account or credit card was used for the transaction. This helps you track spending patterns across different payment methods and understand which accounts are used for which expense types.
CAC
The CAC column indicates whether the transaction is included in Customer Acquisition Cost calculations. Most transactions show "Include" by default. You can change this setting for individual transactions or in bulk to exclude items that shouldn't count toward CAC.
Why it matters: Accurate CAC calculations require precise categorization of sales and marketing expenses. Excluding non-CAC items like one-time purchases or operational expenses ensures your LTV:CAC ratio and customer acquisition metrics remain accurate.
Receipt
Displays an icon when a receipt has been attached to the transaction. Empty cells indicate no receipt is uploaded. You can add receipts through the transaction detail modal or by clicking "View Receipt" in the three-dot menu.
Why it matters: Receipt documentation creates a complete audit trail for expenses, supports tax filings, enables expense reimbursement verification, and provides the backup documentation needed for investor due diligence and financial audits.
Column Customization
Click the column customization icon in the toolbar to control which columns appear in your transaction table. Check or uncheck Date, Vendor, and Amount to show or hide those columns. Click "Reset Column Order" to return to the default layout.
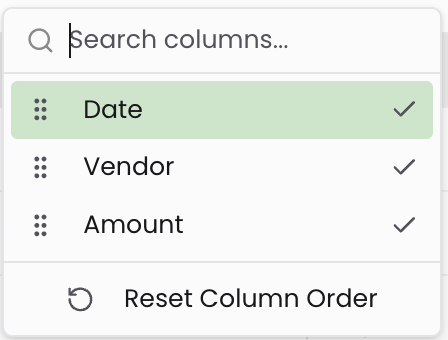
Why it matters: Customizing your view helps you focus on the information most relevant to your current task, whether that's reviewing vendors, checking amounts, or verifying categorization.
Bulk Actions
Select multiple transactions using the checkboxes in the leftmost column. With transactions selected, you can perform several bulk operations:
Bulk Categorization: Assign the same category to multiple transactions at once. Useful for categorizing several transactions from the same vendor or applying consistent categorization to similar expense types.
CAC Actions: Include or exclude selected transactions from Customer Acquisition Cost calculations. This lets you quickly adjust which expenses count toward your CAC metrics.
Export Selected: Export only the transactions you've selected to CSV or XLS format. This creates targeted reports for specific vendors, time periods, or expense categories without exporting your entire transaction history.
Why it matters: Bulk actions save significant time when managing large transaction volumes. Instead of updating transactions one by one, you can categorize dozens of similar transactions or adjust CAC settings in seconds.
Individual Transaction Actions
Click the three-dot menu at the end of any transaction row to access individual transaction options:
View Details: Opens the transaction detail modal showing complete transaction information including category, smart segments, payment channel, account, timing status, and upload receipt options. This is where you make detailed edits to individual transactions.
View Receipt: Opens any attached receipt documentation. If no receipt exists, this option is disabled.
Delete: Removes the transaction from your ledger. Use this for duplicate entries or transactions added in error. Note that deleting synced transactions may be restricted depending on your setup.
Why it matters: Individual transaction management gives you precise control over your financial data. Review details, verify receipts, or remove errors to maintain accurate records.
Exporting Transactions
Click the export icon in the toolbar to access export options. Choose "Export Current Page as CSV" to download transactions currently visible in your filtered view, or "Export Current Page as XLS" for Excel format. The export includes all visible columns and respects your active filters and date range selection.
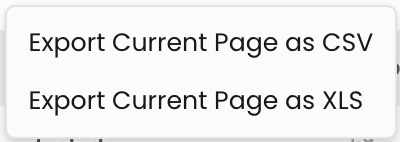
Why it matters: Exporting enables deeper analysis in spreadsheet tools, supports integration with other financial systems, provides backup copies of transaction data, or creates reports for accountants, tax preparers, or investors.
Adding Transactions Manually
Click the green "+" button in the top right to open the Add Transactions modal. You can add transactions individually or upload a CSV file for bulk import.
CSV Bulk Import
Select "Upload .csv file" to import multiple transactions at once. First, select the account where these transactions should be posted. Click "Download CSV Template" to get a properly formatted template file. Fill out the template with your transaction details and upload it by dragging the file into the upload area or clicking "Browse Computer."
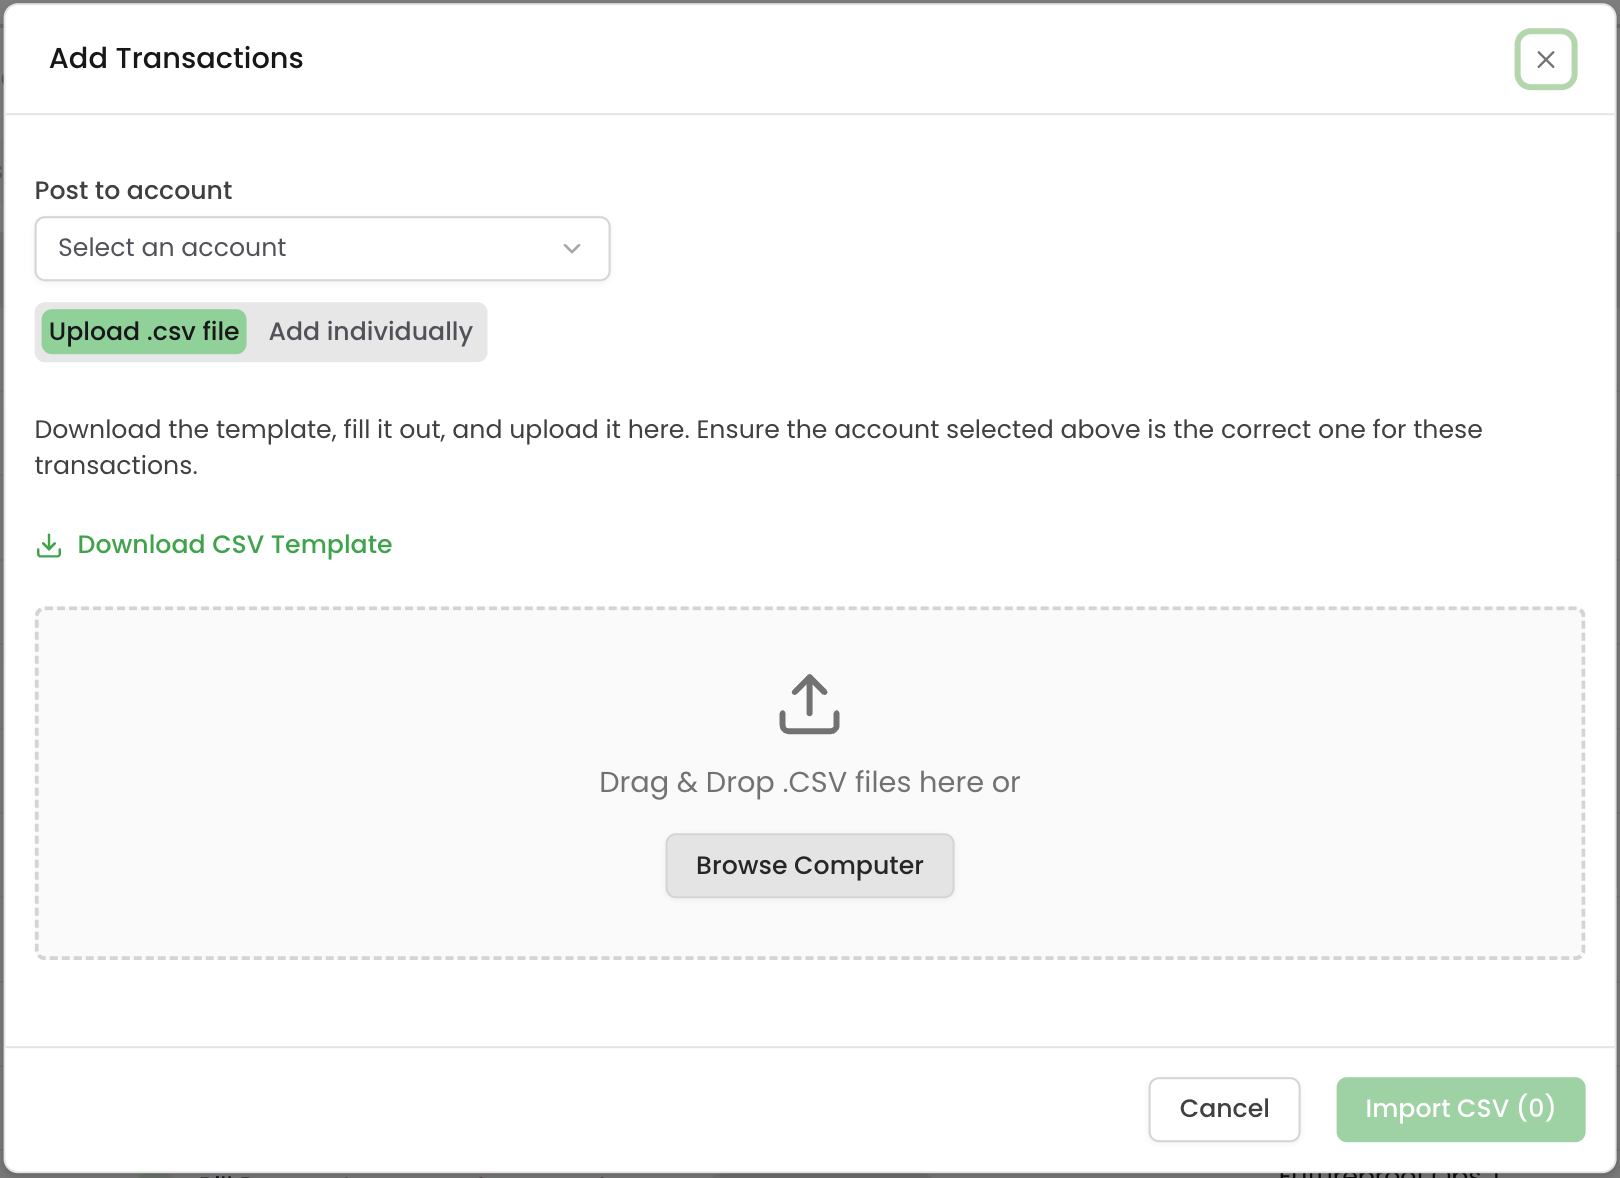
The CSV import supports batch entry of transactions that weren't captured through automatic bank feeds, such as cash transactions, check payments, or transactions from unconnected accounts.
Add Individually
Select "Add individually" to create transactions one at a time. The form includes several fields:
Post to account: Select which account this transaction should be associated with from your connected accounts.
Date: Enter the transaction date using the date picker.
Amount: Enter the transaction value. The system will interpret whether this is income or expense based on the category you select.
Description: Add a description for the transaction. This becomes the vendor name in the transaction list.
Category: Select the appropriate accounting category from your chart of accounts. This determines how the transaction appears in your financial reports.
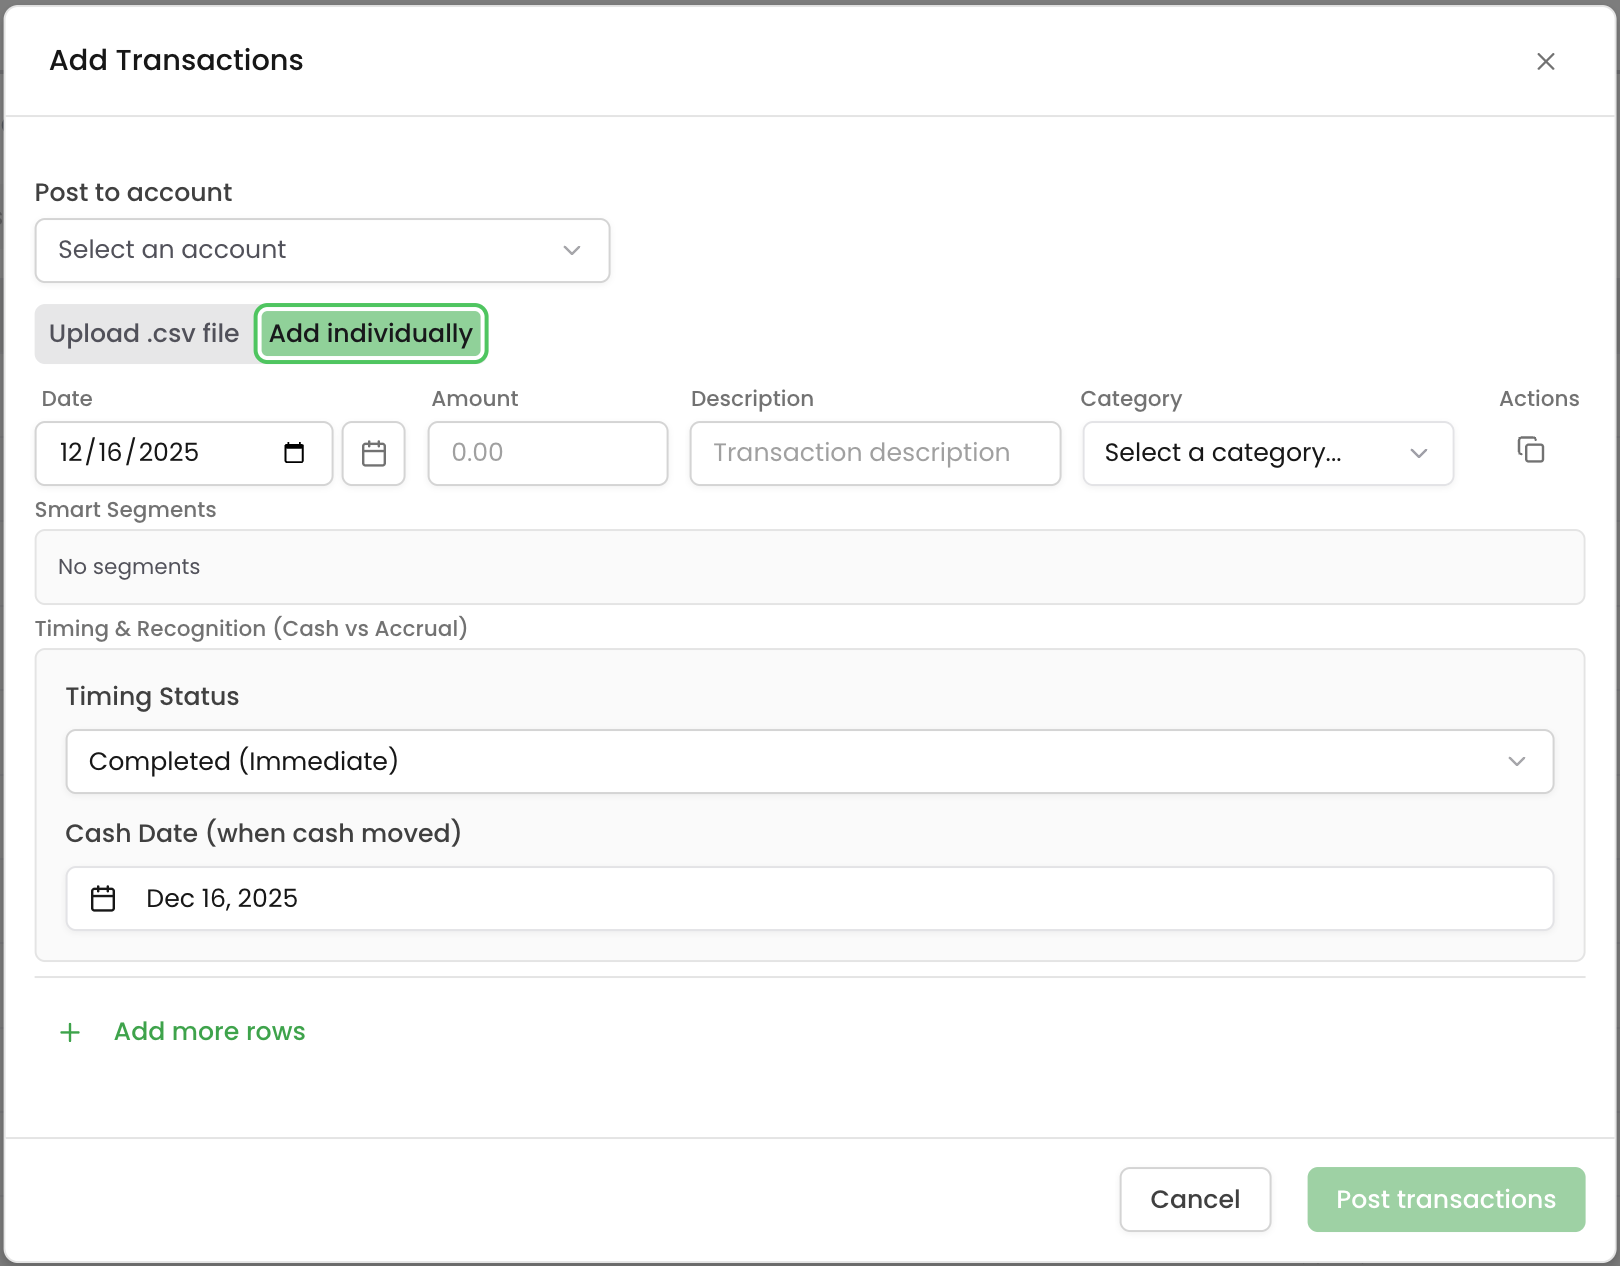
Smart Segments: Assign a department tag if applicable. The form shows "No segments" by default if no department assignment is needed.
Timing & Recognition (Cash vs Accrual): This section controls how the transaction is recognized in your accounting:
Timing Status: Choose from several recognition options:
- Completed (Immediate): Transaction is recognized immediately on the transaction date
- Unpaid (AR Invoice): Creates an accounts receivable entry for revenue not yet collected
- Paid (AR Invoice): Marks an AR invoice as paid
- Overdue (AR Invoice): Flags an overdue receivable
- Deferred Revenue: Recognizes revenue over a future period rather than immediately
- Prepaid Expense: Records an expense that covers a future period
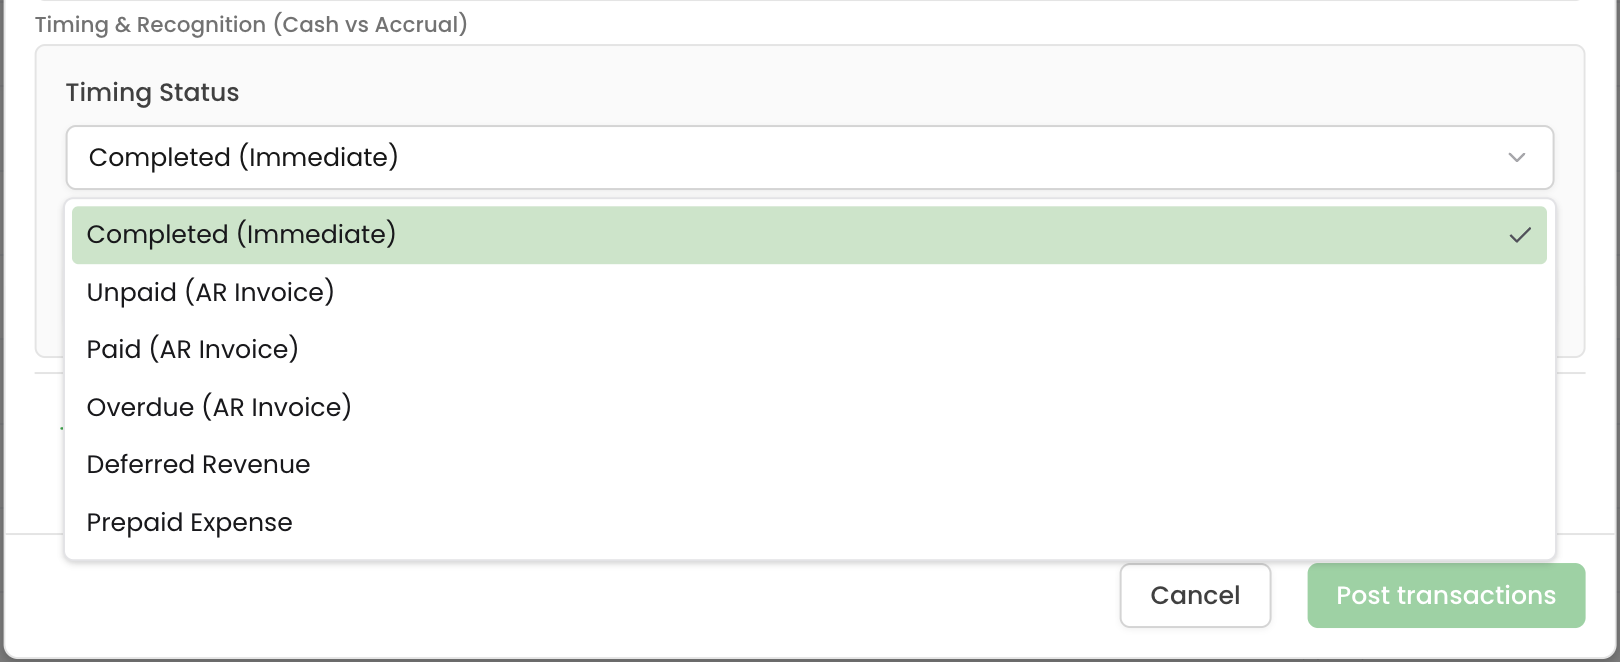
Cash Date (when cash moved): Enter the actual date when cash changed hands. This can differ from the transaction date for accrual accounting purposes.
Why it matters: Manual transaction entry ensures your financial records are complete even when transactions aren't captured automatically. The timing and recognition options support proper accrual accounting, enabling accurate revenue recognition, accounts receivable tracking, and prepaid expense management.
Click "Add more rows" to add multiple transactions in a single session. When finished, click "Post transactions" to save all entries.
Tips for Managing Transactions
Use filters strategically: Create filter combinations that match your workflows. Filter for uncategorized transactions to handle new items, or filter by department to analyze team-specific spending.
Leverage bulk actions: When reviewing transactions, select multiple items with similar characteristics and apply categorization or CAC settings in bulk. This saves time compared to editing transactions individually.
Export regularly: Create periodic exports for backup purposes or to share transaction data with accountants and advisors. Filtered exports let you create targeted reports without sharing your entire transaction history.
Maintain receipt discipline: Upload receipts for significant expenses, travel costs, and any purchases you might need to justify during audits or investor reviews. The receipt status filter helps you identify transactions missing documentation.
Use date presets: The preset date ranges (Current Month, Last Quarter, Year-to-Date) streamline common reviews like month-end close or quarterly analysis. Custom ranges work well for specific reporting periods.
Customize your view: Hide columns you don't need for your current task. This reduces visual clutter and helps you focus on relevant information.
Track CAC accurately: Regularly review the CAC column to ensure only true sales and marketing expenses are included in customer acquisition cost calculations. Exclude operational costs, one-time purchases, or non-acquisition marketing to maintain accurate metrics.
Leverage manual entry: Use manual transaction entry for cash payments, check transactions, or activity from accounts you haven't connected yet. This creates a complete financial picture rather than leaving gaps in your records.
Apply timing rules correctly: Use the timing and recognition options when adding manual transactions to ensure proper accrual accounting. Deferred revenue and prepaid expenses should be recognized over their applicable periods, not immediately.