

Reconciliations Overview
The Reconciliations page is where transactions from your connected bank accounts and credit cards get categorized into your chart of accounts. AI automatically categorizes most transactions, but some require human review to ensure accurate financial reporting.
Accessing Reconciliations
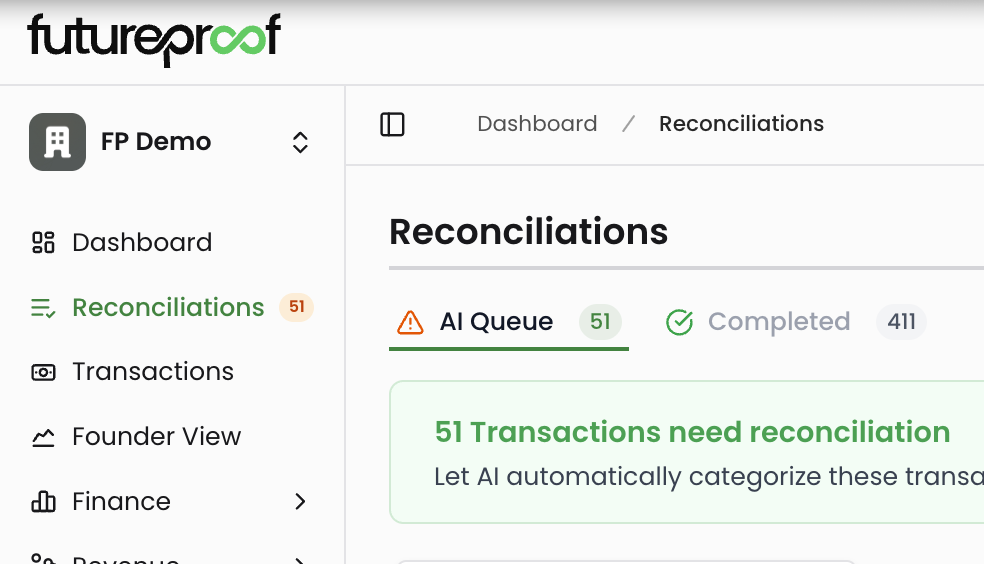
Navigate to Reconciliations in the left sidebar. The page displays two tabs: AI Queue (transactions waiting for categorization) and Completed (transactions already categorized and approved). The header shows your total transaction count, how many are in the AI Queue, how many have been processed, and how many are completed.
Understanding the Queue
AI Queue
Transactions waiting to be categorized appear in the AI Queue. When you click "Analyze All," the AI reviews each transaction and assigns it to the appropriate category in your chart of accounts based on the transaction description, merchant name, and your historical categorization patterns.
The AI Queue includes a banner showing how many transactions need categorization. A green "Analyze All" button triggers automatic categorization for all uncategorized transactions at once. After analysis, transactions move to the Completed tab automatically.
Why it matters: Keeping the queue clear ensures your financial reports reflect accurate, up-to-date information. Uncategorized transactions mean incomplete financial data, which affects everything from your cash burn calculations to your expense breakdown analysis.

Completed
The Completed tab shows all transactions that have been categorized and saved. Each entry displays the transaction details along with the assigned category, AI reasoning for the categorization, and any uploaded receipts.
Why it matters: This is your audit trail. Completed transactions feed directly into your Finance Dashboard widgets, Profit & Loss statements, and expense reports. You can review, edit, or re-analyze any completed transaction if you need to make adjustments.
Transaction Details
Each transaction row shows key information at a glance. The Date column displays when the transaction occurred. The Transaction column shows the merchant or vendor name along with the account where the transaction was posted (such as Spark Cash or your checking account). The Amount column displays the dollar value, with income shown in green and expenses shown in red.
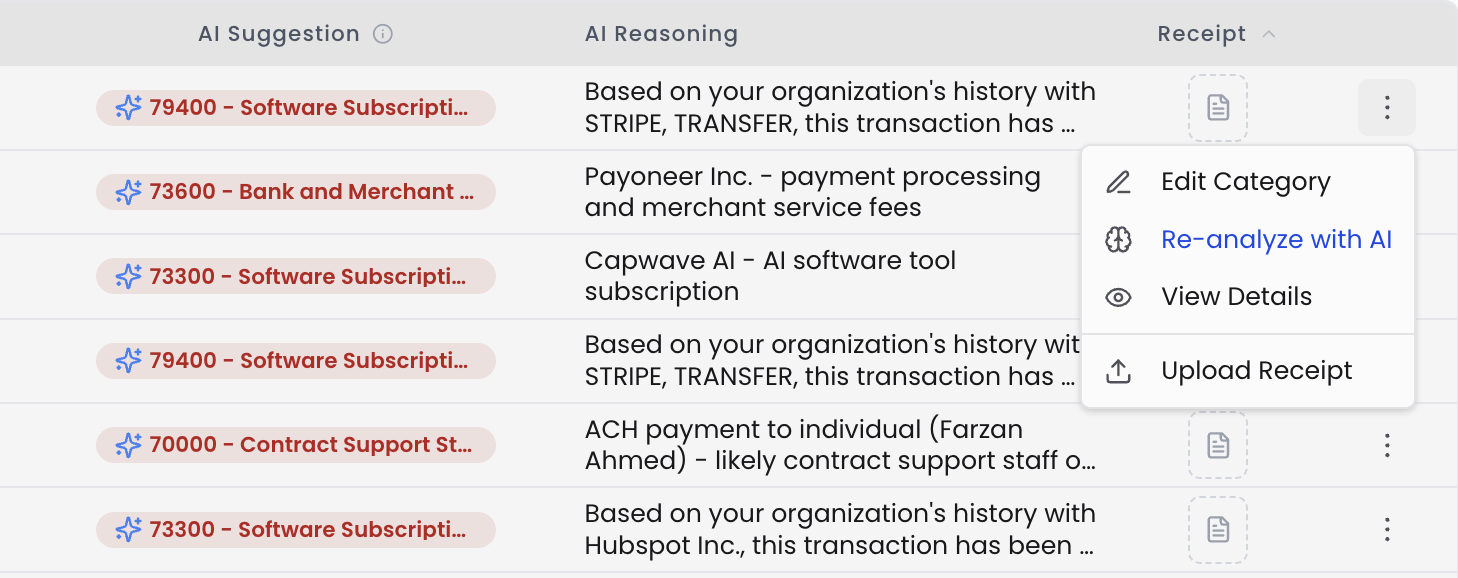
The AI Suggestion column displays the recommended category, showing both the account code and category name (for example, "79400 - Software Subscription - Cost of Revenue"). This suggestion appears as a blue badge. For uncategorized transactions, this column shows an orange "Uncategorized" badge.
The AI Reasoning column explains why the AI chose a particular category. The reasoning might reference your organization's transaction history with that merchant, identify the transaction type based on the description, or note that the transaction was manually categorized by a user. This transparency helps you understand the categorization logic and spot any patterns where the AI might need correction.
The Receipt column shows an icon if a receipt has been uploaded for that transaction. Clicking the three-dot menu at the end of each row reveals options to View Details, Edit Category, Re-analyze with AI, or Upload Receipt.

Working with Individual Transactions

Clicking on any transaction opens a detail modal where you can review and adjust the categorization. The modal displays the merchant name, transaction date, and amount at the top.
Category
The Category field shows the assigned accounting category from your chart of accounts. An "AI Suggest" button appears next to the category dropdown, which you can click to get the AI's recommendation if you want to reconsider the categorization. When you select a category, you'll see an option to "Update all transactions with this category" for that specific merchant. Enabling this checkbox applies the category to all historical and future transactions from that vendor, saving you time on recurring expenses.
Why it matters: Accurate categorization determines where expenses appear in your financial reports. A transaction categorized as "Software Subscription" affects your operating expenses differently than one categorized as "Travel - Airfare" or "Marketing and Advertising."
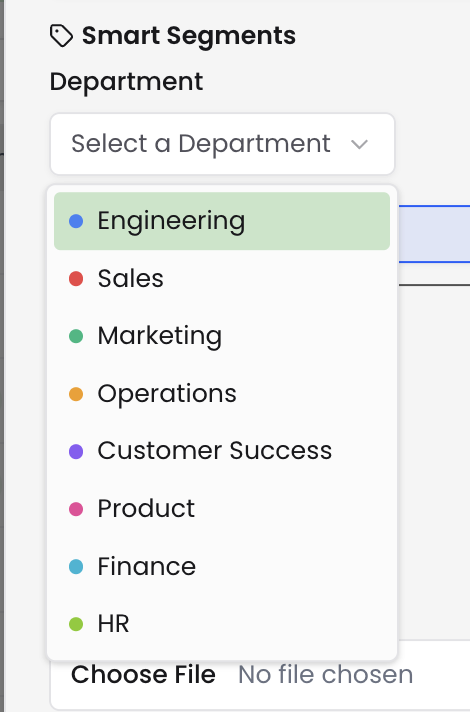
Smart Segments
The Department field under Smart Segments lets you tag transactions with additional context beyond the accounting category. You can assign transactions to departments like Engineering, Sales, Marketing, Operations, Customer Success, Product, Finance, or HR. The AI can also suggest a department based on the transaction details.
Why it matters: Department tags enable more granular expense tracking. You can analyze spending by team, allocate costs to specific projects, or build departmental budgets. This becomes essential as your company scales and you need to understand which parts of your business are driving costs.
Payment Channel and Account
The Payment Channel field shows how the transaction was processed (such as online or in-person). The Account field displays which connected bank account or credit card was used for the transaction. These fields are automatically populated from your transaction data.
Why it matters: Understanding payment channels helps you track spending patterns and identify which accounts are being used for different types of expenses. This information supports cash flow management and helps you optimize which payment methods to use for different expense categories.
Upload Receipt
The Upload Receipt section lets you attach supporting documentation to transactions. You can upload PDF, JPEG, or PNG files up to 5MB. Once uploaded, receipts remain accessible from both the transaction detail modal and the Receipt column in the transaction list.
Why it matters: Attaching receipts creates a complete audit trail for your expenses. This documentation supports tax filings, investor due diligence, expense reporting, and financial audits. Having receipts readily available saves time when you need to verify specific transactions months or years later.
Editing and Re-analyzing Transactions
After transactions are categorized and moved to the Completed tab, you can still make changes. The three-dot menu on each transaction provides several options for ongoing management.
Edit Category opens the transaction detail modal where you can change the assigned category, update the department tag, or modify other transaction details. This is useful when you catch miscategorizations during monthly reviews or when your categorization rules change.
Re-analyze with AI triggers a fresh AI review of the transaction. The AI reconsiders the categorization based on your recent corrections and updated patterns. Use this when you've been training the AI with similar transactions and want it to reconsider its original suggestion.
View Details shows the full transaction information including all metadata and history. Upload Receipt opens the file upload dialog to add supporting documentation to the transaction.
Why it matters: Financial data changes over time. You might realize a transaction was miscategorized when preparing for investor meetings, or you might need to recategorize expenses when restructuring your chart of accounts. These editing capabilities ensure your financial records remain accurate as your understanding evolves.
Tips for Effective Reconciliation
Process the queue regularly: Run "Analyze All" at least weekly to keep uncategorized transactions from accumulating. The more current your categorizations, the more accurate your financial dashboards and reports.
Review AI reasoning: Check the AI Reasoning column to understand why transactions were categorized a certain way. If you notice patterns of incorrect categorization, you can correct them and the AI will learn from your changes.
Use the bulk update feature: When categorizing recurring expenses from the same vendor, enable "Update all transactions with this category" to automatically handle future transactions. This saves time on monthly subscriptions, regular service providers, and other predictable expenses.
Upload receipts for significant expenses: While you don't need receipts for every transaction, attach documentation for large purchases, travel expenses, and anything you might need to justify during audits or investor reviews.
Leverage department tags: Assign department tags to build a clear picture of where costs originate. This becomes valuable when analyzing team-specific burn rates, allocating expenses for project profitability, or planning departmental budgets.
Search and filter effectively: Use the search box to quickly find specific transactions by merchant name, amount, or other details. This speeds up reconciliation when you're looking for particular expenses to review or recategorize.
Cross-reference with your dashboards: After completing reconciliation, check your Finance Dashboard to verify that expense categories and cash flow look accurate. If something seems off, return to Reconciliations to investigate and adjust.